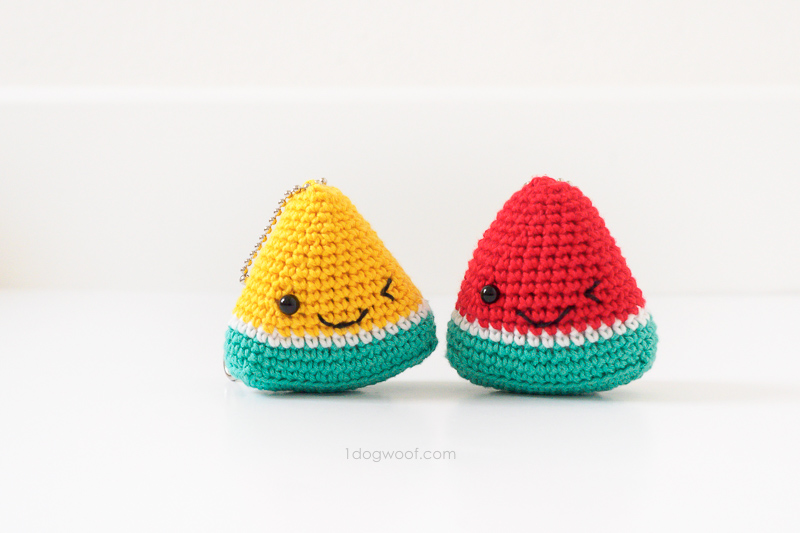
mercoledì 2 gennaio 2019

Fungo portachiavi

IMG_6064 
missdolkapots

For this project you will need:
– scraps of beige and red yarn (or colors of your choice)
– light brown and off white felt
– fiberfill for stuffing
– glue gun, or fabric glue
– yarn needle
The size of the mushroom is approximatively 3 inches, crocheted with a 2.75mm hook (the larger the size of the hook, the larger your mushroom will be).

Abbreviations:
rnd = round
sc = single crochet
inc = increase
dec = decrease
blo = back loops only
flo = front loops only
ch = chain
tr = treble

PATTERN
Stem:
With beige yarn, make a magic ring
Rnd 1: 5 sc in the center of the ring (5)
Rnd 2: 2 sc in each st around (10)
Rnd 3: [1 sc, inc] 5 times (15)
Rnd 4: blo, sc in each st around (15)
Rnd 5: [5 sc, dec] 2 times, 1 sc (13)
Rnd 6: sc in each st around (13)
Optional: I put a little piece of cardboard at the bottom to keep it flat
Rnd 7: [4 sc, dec] 2 times, 1 sc (11)
Rnd 8 to 9: sc in each st around (11)
Rnd 10: [3 sc, dec] 2 times, 1 sc (9)
rnd 11 to 13: sc in each st around (9)
Rnd 14: ch 3, 2 tr in same st, 3 tr in each st around, join to first tr (26)
Fasten off, and stuff your stem with fiberfill. Cut a circle in a piece of light brown felt, a little smaller than the circumference of your last row. Glue it on your mushroom then resume your work.

IMG_6048 

Cap:
With red yarn, make a magic ring
Rnd 1: 5 sc in the center of the ring (5)
Rnd 2: 2 sc in each st around (10)
Rnd 3: [1 sc, inc] 5 times (15)
Rnd 4: [2 sc, inc] 5 times (20)
Rnd 5: [3 sc, inc] 5 times (25)
Rnd 6: inc, 24 sc (26)
Rnd 7 to 8: sc in each st around (26)
Rnd 9: flo, sc in each st around (26)
Fasten off, and leave a long tail for sewing. Insert your remaining thread on the other side of the cap to start embroidering. Sew around using the stitches underneath the cap and front loops of the stem. You can add stuffing half way through the sewing, but don’t stuff too much or the bottom of the cap will not be flat. Fasten off, and hide your loose threads by embroidering them within stitches.


Portachiavi Coccinella

index 
 2014 © maidireamigurumi.blogspot.it

Materials
- Hook 2.75
- Yarn needle and scissors
- Crochet thread size 3 in black red and white
- Black piece of felt
- Stuff material
- Keychain materials (a little ring and a lobster hook with black cord)
- Pliers to open the little ring
- Pins for assembling
- Bijoux glue

Abbreviations & symbols
sc single crochet
inc single crochet increase, work 2 sc’s in the same stitch
dec single crochet decrease, single crochet 2 together (sc2tog)
sc BLO single crochet in Back Loop Only
ch+sl
st
chain at the beginning of the row and slip stitch at the end. 

Ladybug Body
With red yarn, work these rounds in circle (ch at the beginning of the row and sl st at the
end)
1. 6 sc in magic ring [6]
2. 6 inc [12]
3. *1 sc, 1 inc **, repeat from * to ** 6 times [18]
4. *2 sc, 1 inc **, repeat from * to ** 6 times [24]
5-7. 24 sc [24]
Switch color yarn to black.
8. *2 sc, 1 dec **, repeat from * to ** 6 times BLO [18]
9. *1 sc, 1 dec **, repeat from * to ** 6 times [12]
Stuff firmly
10. 6 dec [6]
Fasten off leaving a long tail for sewing firmly the last 6 stitches.

Ladybug head
With black yarn
1. Work 3 ch. 1 sc on the second chain from hook. 4 sc in next chain. Turn
your work 180° clockwise and work 3 sc in next chain. Slip stitch on the first
stitch of the row. [8]
2. 1 ch, 8 sc, 1 sl st on the firts stitch of the row. [8] Fasten off leaving a long
tail for sewing.
On the right you can find the graphical representation of these rounds. 

Assembling
- Using pins, put the head on the body of the ladybug and sew it firmly.
- Before cutting the thread, use it to embroider the black line on the ladybug body.
- Cut 7 rounded pieces of black felt and glue it on the ladybug body, one near the head, 3
on the black line’s right and 3 on the black line’s left.
- Embroider 2 little eyes with white yarn, using your favourite technique. I used the french
knot technique.
- With pliers, open the little ring and put it through the first round of the body. Join the
lobster hook with black cord and complete your keychain.

Portachiavi Anguria

yellow and red watermelon keychains 
1dogwoof.com


ABBREVIATIONS

  • sl st – slip stitch
  • ch – chain stitch
  • sc – single crochet
  • sp – space
  • corner – [1 sc, 2 ch, 1 sc]
  • BLO – back loops only
  • sc2tog – single crochet decrease: Insert hook into front loop of next st. Without yarning over, insert hook into front loop of next st. Yarn over. Pull through 2 loops on hook. Yarn over, pull through remaining loop on hook.

PATTERN NOTES

  • Skill level Beginner.
  • Gauge doesn’t matter on this project, as long as it’s tight enough to prevent the stuffing from coming out.
  • Pattern is worked in seamed rounds.
  • First st in each round is worked into same st as join.

Watermelon Amigurumi Keychain Instructions

Round 1: (in GREEN) Ch 14. Work 1 sc into the 2nd ch from hook. Work 1 sc in each of next 11 st, [1 sc, 2 ch, 1 sc, 2 ch, 1 sc] in next ch (this turns the corner), 1 sc in each of next 11 st, [1 sc, 2ch, 1sc, 2 ch] in last ch. Join to first sc with sl st.
Round 2: Ch 1. Work 1 sc in each of next 13 st, 1 corner in ch 2 sp, 1 sc in next st, 1 corner in ch 2 sp, 1 sc in each of next 13 st, 1 corner in ch 2 sp, 1 sc in next st, 1 corner in ch 2 sp. Join to first sc with sl st.
Round 3: Ch 1. Work 1 sc in each of next 14 st, 1 corner in ch 2 sp, 1 sc in each of next 3 st, 1 corner in ch 2 sp, 1 sc in each of next 15 st, 1 corner in ch 2 sp, 1 sc in each of next 3 st, 1 corner in ch 2 sp, 1 sc in next st. Join to first sc with sl st.
Round 4: Ch 1. In BLO, work 1 sc in each sc st around, skipping ch sp. Join to first sc with sl st. (44)
Round 5: Ch 1, Work 1 sc in each st around. Join to first sc with sl st. (44)
Round 6: Ch 1. Work 1 sc in each of next 4 st, 1 sc2tog, 1 sc in next st, 1 sc2tog, 1 sc in each of next 17 st, 1 sc2tog, 1 sc in next st, 1 sc2tog, 1 sc in each of next 13 st. Join to first sc with sl st. (40)
Round 7: (in WHITE) Ch 1. Work 1 sc in each st around. Join to first sc with sl st. (40)
Round 8: (in RED) Ch 1. Work 1 sc in each of next 11 st, 1 sc2tog, 1 sc in each of next 5 st, 1 sc2tog, 1 sc in each of next 11 st, 1 sc2tog, 1 sc in each of next 5 st, 1 sc2tog. Join to first sc with sl st. (36)
Round 9: Ch 1. Work 1 sc in each st around. Join to first sc with sl st. (36)
Round 10: Ch 1. Work 1 sc2tog, 1 sc in each of next 9 st, 1 sc2tog, 1 sc in each of next 5 st, 1 sc2tog, 1 sc in each of next 9 st, 1 sc2tog, 1 sc in each of next 5 st. Join to first sc with sl st. (32)
Round 11: Ch 1. Work 1 sc in each st around. Join to first sc with sl st. (32)
Round 12: Ch 1. Work 1 sc2tog, 1 sc in each of next 7 st, 1 sc2tog, 1 sc in each of next 5 st, 1 sc2tog, 1 sc in each of next 7 st, 1 sc2tog, 1 sc in each of next 5 st. Join to first sc with sl st. (28)
Round 13: Ch 1. Work 1 sc in each st around. Join to first sc with sl st. (28)
Round 14: Ch 1. Work 1 sc2tog, 1 sc in each of next 5 st, 1 sc2tog, 1 sc in each of next 5 st, 1 sc2tog, 1 sc in each of next 5 st, 1 sc2tog, 1 sc in each of next 5 st. Join to first sc with sl st. (24)
Round 15: Work 1 sc in each st around. Join to first sc with sl st. (24)

Add the eyes and mouth

  • Eye – Insert safety eye between the 3rd and 4th red rounds, 2 st to the right of the sc2tog st.
  • Wink – With black yarn, insert needle from inside out, between the 2nd and 3rd red rounds, 2 st to the left of the sc2tog st (starting point). Insert the needle outside in, between the 3rd and 4th red rounds, approximately the same width as the safety eye (middle point). Insert the needle inside out, between the 4th and 5th red rounds, directly above the starting point (end point). Insert the needle outside in, at the middle point, to complete the wink.
  • Smile – Embroider on a smile centered and just slightly below the eyes.
Round 16: Ch 1. Work 1 sc2tog, 1 sc in each of next 3 st, 1 sc2tog, 1 sc in each of next 5 st, 1 sc2tog, 1 sc in each of next 3 st, 1 sc2tog, 1 sc in each of next 5 st. Join to first sc with sl st. (20)
Round 17: Ch 1. Work 1 sc in each st around. Join to first sc with sl st. (20)
Round 18: Ch 1. Work 1 sc2tog, 1 sc in next st, 1 sc2tog, 1 sc in each of next 5 st, 1 sc2tog, 1 sc in next st, 1 sc2tog, 1 sc in each of next 5 st. Join to first sc with sl st. (16)
Round 19: Ch 1. Work 1 sc in each st around. Join to first sc with sl st. (16)
Round 20: Ch 1. Work 2 sc2tog, 1 sc in each of next 4 st, 2 sc2tog, 1 sc in each of next 4 st. Join to first sc with sl st. (12)
** Stuff the watermelon firmly to fill out the shape.
Cut yarn, leaving a tail. Squeeze the round together, aligning the 4 sc to the 4sc. Use the mattress stitch to close. Fasten off and weave in ends.

Closing up a watermelon amigurumi 

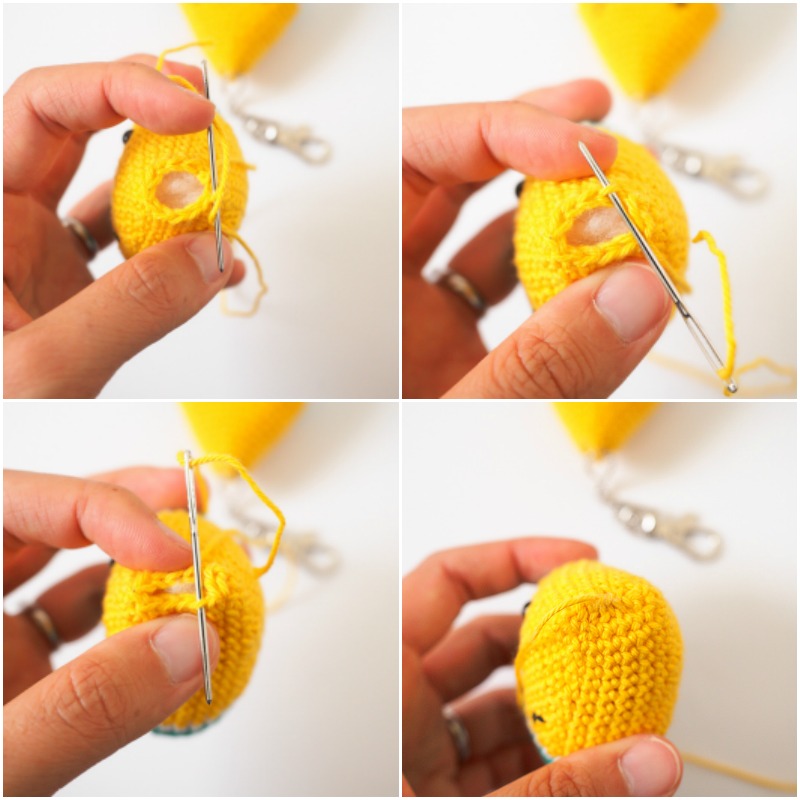
Insert the ball chain clasp through any available stitch on the top of the watermelon. I used a needle to help things along – it takes some effort, but you can always find a small gap to get the chain through. Once the chain is attached, just close the ball chain around a lobster clasp and you’re all set!
On my first keychain, I created a loop at the top of the watermelon to insert the ball chain, but it looked a bit weird, so I adjusted to insert the ball chain straight through the top of the watermelon instead.

mercoledì 7 novembre 2018

Christmas Slippers Socks

repeatcrafterme

Slipper Sock Pattern (make 2):
Magic ring, chain 1 and make 8 SC in ring, join to first SC, chain 1 (8 SC)
Round 2: 2 SC in first, SC in next, repeat around, join, chain 1 (12 SC)
Round 3: 2 SC in first, SC in next 2, repeat around, join, chain 1 (16 SC)
Round 4: SC in each stitch around, join, chain 1 (16 SC)
Round 5: 2 SC in first, SC in next 3, repeat around, chain 1 (20 SC)
Round 6: SC in each stitch around, join, chain 1 (20 SC)
Round 7: 2 SC in first, SC in next 4, repeat around, chain 1 (24 SC)
Round 8-15: SC in each stitch around, join, chain 1 (24 SC)

Now we are going to work in rows to make the heel. If you want to make the slipper socks bigger, now is a good place to continue a few more rounds before starting on the heel.

ROW 16: SC in first 12, chain 1, turn (12 SC)
Row 17-20: SC in each stitch across, chain 1, turn
Row 21: SC in first 2, SC Decrease 4x, SC in last 2, chain 1, turn (8 SC)
Row 22: SC in first, SC Decrease 3x, SC in last, chain 1, turn (5 SC)
Row 23: SC Decrease, SC, SC Decrease, chain 1, turn (3 SC)
Row 24: SC Decrease (skip over middle stitch), chain 1, turn

Now go back into working in rounds
Round 25: SC in each stitch around making a total of 32 stitches (do the best you can on rough edges), join, chain 1 (32 SC)
Round 26-27: SC around making a SC Decrease in two corners, join, chain 1 (see photos)
Round 28-35 or desired length: SC in each stitch around, join, chain 1
Fasten off and weave in ends.
Round 36: Reverse SC or crab stitch

Antlers Pattern (make 2):
With dark brown yarn…
Chain 10, Slip stitch in second chain from hook and in next 3, chain 4, slip stitch in second chain from hook and in next two, slip stitch to next spot in starting chain, slip stitch in next, chain 3, slip stitch in second chain from hook and in next, slip stitch to next spot in starting chain and the rest of the way down the starting chain. Fasten off and stew onto sides of socks.

Make a Red pom-pom for the nose!

Sew on two black buttons for the eyes.

venerdì 28 settembre 2018

Stella


Worsted weight yarn (Shown in Loops and Thread Impeccable Solids)
o Butterscotch (120 yards)
  •  G (4.00mm) hook or size needed to obtain a firm fabric
  •  Tapestry Needle
  •  Stitch Marker
  • Stuffing
  •  Eyes
o 15mm black safety eyes OR
o Black felt (See tutorial at the end of the pattern)

Notes
  • All pieces are worked through the back loops only.
  •  The pattern is worked in continuous spiral. Use a stitch marker to mark the start of the round.

Points (Make 5)
 
Round 1: SC 4 in Magic Ring— 4 sts
Round 2: (SC 2 in next st) 4 times— 8 sts
Round 3: SC in each st around
Round 4: (SC 2 in next st, SC in next st) 4 times—12 sts
Round 5: SC in each st around
Round 6: (SC 2 in next st, SC in next 2 sts) 4 times—16 sts
Round 7: SC in each st around
Round 8: (SC 2 in next st, SC in next 3 sts) 4 times—20 sts
Round 9: SC in each st around
Round 10: (SC 2 in next st, SC in next 4 sts) 4 times—24 sts
Round 11: SC in each st around
Round 12: (SC 2 in next st, SC in next 5 sts) 4 times—28 sts
Round 13: SC in each st around
Round 14: (SC 2 in next st, SC in next 6 sts) 4 times—32 sts
Round 15: SC in each st around
Round 16: (SC 2 in next st, SC in next 7 sts) 4 times—36 sts
Fasten off with long tail. Do not fasten off the fifth point; continue to work for the body


FRONT
Joining the next point with SC2tog

Round 1: (SC2tog, SC in next 7 sts) 2 times; to join next point, (SC2tog in next point, SC in next 7 sts,
SC2tog, SC in next 7 sts). Repeat for each point— 80 sts
To join in a round, SC2tog the first 2 sts of round 1, this is the first SC2tog of round 2
Round 2: (SC2tog, SC in next 6 sts) 10 times—70 sts
Round 3: (SC2tog, SC in next 12 sts) 5 times—65 sts
Round 4: (SC2tog, SC in next 11 sts) 5 times—60 sts
Round 5: (SC2tog, SC in next 10 sts) 5 times—55 sts
Round 6: (SC2tog, SC in next 9 sts) 5 times—50 sts
Round 7: (SC2tog, SC in next 3 sts) 10 times— 40 sts
Round 8: (SC2tog, SC in next 2 sts) 10 times— 30 sts
Round 9: (SC2tog, SC in next st) 10 times—20 sts
Round 10: (SC2tog) 10 times—10 sts
Round 11: (SC2tog) 5 times—5 sts
Fasten off

Back
To join the yarn, locate the junction of the points where there is no yarn tail and attach the yarn to the first stitch of the point to the left.


Follow the instructions as for the Front.
After round 8, stop and sew up the holes created by where the points are connected.
If using safety eyes, attach them now the front of the star at round 7. Felt eyes will be attached after the star is finished.
Stuff the star, beginning with the points. For best results, start with a little bit of stuffing in each point and slowly fill up each point. Once all of the points are stuffed, begin stuff the body.
Continue working, stopping and adding a little more stuffing every few rounds until the end.
Fasten off.
Finishing
If using felt eyes, skip ahead to the tutorial at the end.
Weave in any loose ends

Candy Cane


MEASUREMENT
Approx 5½” [14 cm] long.
GAUGE
13 sc and 14 rows = 4” [10 cm].
Hook= 5 mm
INSTRUCTIONS
Coil (make 1 each in A and B)
Ch 40. 2 dc in 4th ch from hook. 3 dc in each ch to end of chain. Fasten off.
Twist Coils around each other to form Candy Cane. Bend slightly approx 2½” [6 cm]
from top. Using A, tack loosely to form curve. With A, make hanging loop.

Luci di Natale


Materials
G Hook
Worsted weight yarn in desired colors
Polyfil
Needle Safety Eyes (optional)
Black embroidery thread (optional)

Abbreviations
sc: single crochet
inc: 2 sc in one stitch
dec: 1 sc over two stitches

Directions
Make a 3 stitch magic ring
Row 1: Inc around (6)
Row 2: *sc 2, inc 1. Repeat from * (8)
Row 3: *sc 1, inc 1. Repeat from * (12)
Row 4: *sc 2, inc 1. Repeat from * (16)
Row 5: *sc 3, inc 1. Repeat from * (20)
Rows 6-8: sc around (20)
Row 9: *sc 3, dec 1. Repeat from * (16)
Row 10: *sc 2, dec 1. Repeat from * (12)

Attach safety eyes if desired. Stuff with Polyfil.

Row 11: dec around (6)
Row 12: switch to green yarn, sc around (6)
Row 13: sc around (6)
Break off yarn, weave in ends. Embroider eyes and mouth if desired.
To string together bulbs, begin a chain with desired color and chain through the top of a bulb every 10 inches or spaced however far apart you wish.

Pattern by Jill Watt www.dappertoad.com
Ravelry: http://www.ravelry.com/designers/jill-watt
Craftsy: http://www.craftsy.com/user/754812/pattern-store

Related Posts Plugin for WordPress, Blogger...